Automatic Runner Provisioning (Path 2)
This guide covers Path 2 of Proxmox Launchpad: automatic runner provisioning where our action creates and manages GitHub runners for you. Each branch gets its own dedicated runner and container with complete lifecycle management.
This pathway requires sharing your GitHub Personal Access Token with our action to manage runners on your behalf. Only use this if you're comfortable with this security consideration.
When you provide your GitHub PAT in the manage-container job, Proxmox Launchpad will automatically comment on pull requests with container access information, making it easy for collaborators to test your changes.
Prerequisites
Before getting started, ensure you have:
- Valid Proxmox account on the MIE cluster
- GitHub Personal Access Token with runner management permissions
- Repository secrets configured (see below)
Repository Secrets Setup
Navigate to your repository settings and add these secrets:
| Secret Name | Description | Example |
|---|---|---|
PROXMOX_USERNAME | Your assigned Proxmox username | john.doe |
PROXMOX_PASSWORD | Your assigned Proxmox password | your-password |
GH_PAT | GitHub Personal Access Token with runner permissions | ghp_xxxxxxxxxxxx |
Store these securely in your repository's Settings > Secrets and variables > Actions. Never commit credentials directly to your code.
GitHub Personal Access Token Setup
Creating a GitHub PAT
To use automatic runner provisioning, you must create a GitHub Personal Access Token with runner management permissions:
- Navigate to GitHub settings: Go to your GitHub account settings
- Access developer settings: Click "Developer settings" (bottom left)
- Create new token: Navigate to "Personal Access Tokens (classic)" → "Generate new token"
- Configure token:
- Give your token a descriptive name
- Set an appropriate expiration date (No expiration date is not recommended)
- Select the
manage_runners:orgpermission (ormanage_runners:enterprisefor enterprise repositories)
- Generate and store: Generate the token and store it securely
- Add to repository: Add it as a repository secret named
GH_PAT
This PAT gives our action the ability to create, modify, and delete runners in your GitHub organization/repository. Store it securely and never share it publicly.
PAT Permissions Required
| Permission | Scope | Purpose |
|---|---|---|
manage_runners:org | Organization repositories | Create/delete runners for org repos |
manage_runners:enterprise | Enterprise repositories | Create/delete runners for enterprise repos |
Workflow Setup
Required Workflow Triggers
All Proxmox Launchpad workflows must include these trigger events:
on:
  push:     # Updates existing containers
  create:   # Creates containers for new branches
  delete:   # Removes containers when branches are deleted
Dual-Job Configuration
Automatic runner provisioning requires two jobs: a setup job and a container management job:
name: Proxmox Container Management (Auto Runners)

on:
  push:
  create:
  delete:

jobs:
  setup-runner:
    runs-on: ubuntu-latest
    steps:
      - name: Install Dependencies
        run: |
          sudo apt install -y sshpass jq

      - uses: maxklema/proxmox-launchpad@main
        with:
          proxmox_username: ${{ secrets.PROXMOX_USERNAME }}
          proxmox_password: ${{ secrets.PROXMOX_PASSWORD }}
          github_pat: ${{ secrets.GH_PAT }}

  manage-container:
    runs-on: self-hosted
    needs: setup-runner
    steps:
      - uses: maxklema/proxmox-launchpad@main
        with:
          proxmox_username: ${{ secrets.PROXMOX_USERNAME }}
          proxmox_password: ${{ secrets.PROXMOX_PASSWORD }}
          github_pat: ${{ secrets.GH_PAT }}  # Enables PR commenting
Job Responsibilities
| Job | Purpose | Runner | Description |
|---|---|---|---|
setup-runner | Runner provisioning | ubuntu-latest | Creates dedicated runners for your branch |
manage-container | Container management | self-hosted | Manages containers using the provisioned runner |
Configuration Options
Basic Container Properties
Configure your container's fundamental settings:
- uses: maxklema/proxmox-launchpad@main
  with:
    proxmox_username: ${{ secrets.PROXMOX_USERNAME }}
    proxmox_password: ${{ secrets.PROXMOX_PASSWORD }}
    github_pat: ${{ secrets.GH_PAT }}

    # Optional: HTTP port (default: 3000)
    http_port: 8080

    # Optional: Linux distribution (default: debian)
    linux_distribution: debian  # Options: debian, rocky

    # Optional: SSH public key for passwordless access
    public_key: ${{ secrets.SSH_PUBLIC_KEY }}
Configuration Details
| Property | Required | Default | Description |
|---|---|---|---|
proxmox_username | Yes | N/A | Your assigned Proxmox username |
proxmox_password | Yes | N/A | Your assigned Proxmox password |
github_pat | Yes | N/A | GitHub Personal Access Token with runner permissions |
http_port | No | 3000 | HTTP port (80-60000) for your application |
linux_distribution | No | debian | Container OS: debian (Debian 12) or rocky (Rocky 9.5) |
public_key | No | N/A | SSH public key for passwordless container access |
SSH Access Setup
For enhanced security, add your SSH public key:
public_key: ${{ secrets.SSH_PUBLIC_KEY }}
Benefits:
- Passwordless SSH access to your containers
- More secure than password authentication
- Easier automation and scripting
Entering a public key is highly recommended. To create a private/public key pair on your machine, reference this guide.
Automatic Deployment Configuration
Enable automatic deployment to have your application deployed on every push:
If you want Proxmox Launchpad to automatically deploy your application, consider the options below and add them to your workflow file. If you do not want to deploy your application automatically, you do not need to include any of the options below and can simply disregard them.
Single-Component Applications
For applications with a single service (React app, Flask server, etc.):
manage-container:
  runs-on: self-hosted
  needs: setup-runner
  steps:
    - uses: maxklema/proxmox-launchpad@main
      with:
        proxmox_username: ${{ secrets.PROXMOX_USERNAME }}
        proxmox_password: ${{ secrets.PROXMOX_PASSWORD }}
        github_pat: ${{ secrets.GH_PAT }}

        # Deployment configuration
        project_root: ""  # Leave blank for repository root
        install_command: "npm install"
        start_command: "npm start"
        runtime_language: "nodejs"

        # Optional: Build command
        build_command: "npm run build"

        # Optional: Environment variables
        container_env_vars: '{"API_KEY": "your-api-key", "NODE_ENV": "production"}'

        # Optional: Services
        services: '["mongodb", "redis"]'
Multi-Component Applications
For applications with multiple services (frontend + backend, microservices, etc.):
manage-container:
  runs-on: self-hosted
  needs: setup-runner
  steps:
    - uses: maxklema/proxmox-launchpad@main
      with:
        proxmox_username: ${{ secrets.PROXMOX_USERNAME }}
        proxmox_password: ${{ secrets.PROXMOX_PASSWORD }}
        github_pat: ${{ secrets.GH_PAT }}

        # Multi-component configuration
        install_command: '{"/frontend": "npm install", "/backend": "pip install -r requirements.txt"}'
        start_command: '{"/frontend": "npm start", "/backend": "flask run --host=0.0.0.0"}'
        runtime_language: '{"/frontend": "nodejs", "/backend": "python"}'

        # Optional: Build commands per component
        build_command: '{"/frontend": "npm run build", "/backend": "python setup.py build"}'

        # Optional: Environment variables per component
        container_env_vars: '{"/frontend": {"REACT_APP_API_URL": "http://localhost:5000"}, "/backend": {"FLASK_ENV": "production"}}'

        # Optional: Root directory command (e.g., Docker Compose)
        root_start_command: "docker-compose up -d"
Multi-Component Structure
Each component path is relative to your project root:
your-repo/
├── frontend/          # Component path: "/frontend"
│   ├── package.json
│   └── src/
├── backend/           # Component path: "/backend"
│   ├── requirements.txt
│   └── app.py
└── docker-compose.yml # Root commands run here
Automatic Deployment Properties
| Propety | Required? | Description | Single Component | Multi-Component |
|---|---|---|---|---|
multi_component | Conditional | A y flag that specifies if your application is multi-component. This only needs to be set if your application is multi-component. | N/A | A string of y. |
container_env_vars | No. | Key-Value Environment variable pairs. | Dictionary in the form of: { "api_key": "123", "password": "abc"} | Dictionary in the form of: '{"/frontend": { "api_key": "123"}, "/backend": { "password": "abc123" }}'. |
install_command | Yes* | Commands to install all project dependencies | String of the installation command, i.e. npm install. | Dictionary in the form of: '{"/frontend": "npm install", "/backend": "pip install -r ../requirements.txt"}'. |
build_command | No | Commands to build project components | String of the build command, i.e. npm build. | Dictionary in the form of: '{"/frontend": "npm build", "/backend": "python3 build.py"}'. |
start_command | Yes* | Commands to start project components. | String of the start command, i.e. npm run. | Dictionary in the form of: '{"/frontend": "npm run", "/backend": "flask run"}'. |
runtime_language | Yes* | Runtime language of each project component, which can either be nodejs or python. | String of runtime environment, i.e. nodejs | Dictionary in the form of: '{"/frontend": "nodejs", "/backend": "python"}'. |
root_start_command | No | Command to run at the project directory root for multi-component applications. | N/A | String of the command, i.e. Docker-compose up ... |
- (*) These options are only required if
root_start_commandis not provided, as that command may be a docker build and/or a docker compose command that builds the entire application.
Services Configuration
Add pre-configured services to your container:
# Available services
services: '["mongodb", "postgresql", "redis", "docker", "nginx", "apache"]'
Available Services
| Service | Description | Use Case |
|---|---|---|
mongodb | MongoDB database | Document storage, NoSQL applications |
postgresql | PostgreSQL database | Relational database, SQL applications |
redis | Redis cache | Caching, session storage |
docker | Docker runtime | Containerized applications |
nginx | NGINX web server | Reverse proxy, static file serving |
apache | Apache web server | Web hosting, PHP applications |
rabbitmq | RabbitMQ message broker | Message queuing, microservices |
memcached | Memcached caching | Distributed caching |
mariadb | MariaDB database | MySQL-compatible database |
meteor | Meteor framework | Full-stack JavaScript applications |
Some services like meteor include other services (MongoDB). You don't need to install dependencies separately.
Custom Services
Install services not in the standard list:
custom_services: |
  [
    ["sudo apt-get update", "sudo apt-get install -y nginx", "sudo systemctl enable nginx", "sudo systemctl start nginx"],
    ["curl -fsSL https://get.docker.com | sh", "sudo systemctl enable docker", "sudo systemctl start docker"]
  ]
Each array represents the installation commands for one custom service.
Make sure you enable and start your service using the systemctl service manager CLI.
Pull Request Integration
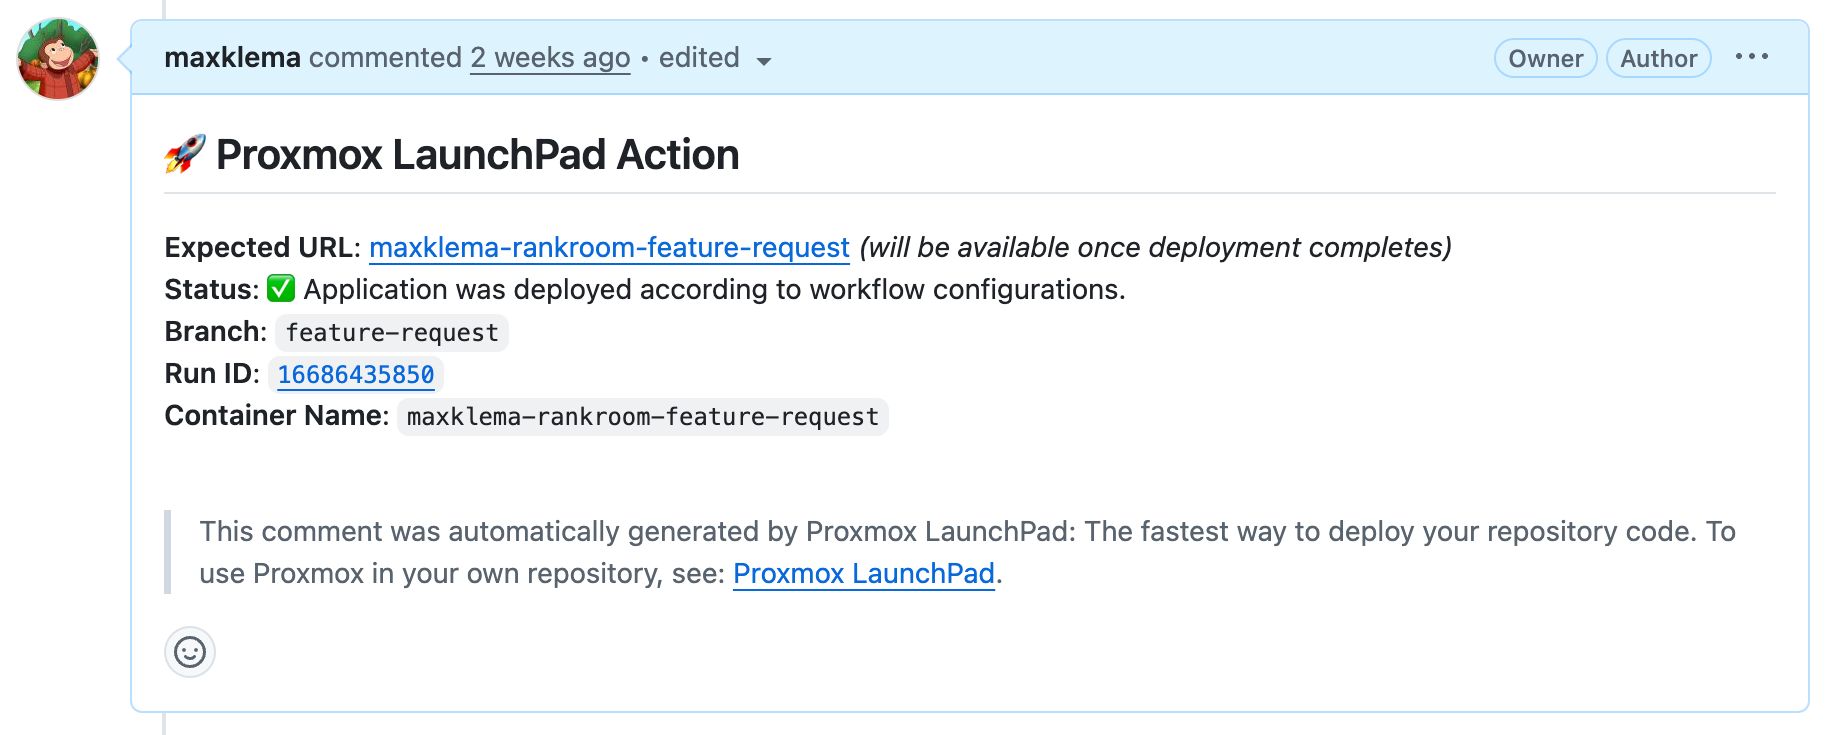
Automatic PR Comments
When you include github_pat in your manage-container job, Proxmox Launchpad automatically comments on pull requests with container information:
This feature enables team members to easily access and test changes without needing to set up their own environments.
PR Comment includes:
- Public domain URL for easy access
- Workflow run ID for tracking
- Deployment status (success/failure)
- Container details (SSH access, ports)
Example PR Comment
Complete Workflow Examples
Example 1: React Application with MongoDB
name: React App with Auto Runners

on:
  push:
  create:
  delete:

jobs:
  setup-runner:
    runs-on: ubuntu-latest
    steps:
      - name: Install Dependencies
        run: |
          sudo apt install -y sshpass jq
      - uses: maxklema/proxmox-launchpad@main
        with:
          proxmox_username: ${{ secrets.PROXMOX_USERNAME }}
          proxmox_password: ${{ secrets.PROXMOX_PASSWORD }}
          github_pat: ${{ secrets.GH_PAT }}

  manage-container:
    runs-on: self-hosted
    needs: setup-runner
    steps:
      - uses: maxklema/proxmox-launchpad@main
        with:
          proxmox_username: ${{ secrets.PROXMOX_USERNAME }}
          proxmox_password: ${{ secrets.PROXMOX_PASSWORD }}
          github_pat: ${{ secrets.GH_PAT }}
          public_key: ${{ secrets.SSH_PUBLIC_KEY }}

          # Container settings
          http_port: 3000
          linux_distribution: debian

          # Application deployment
          install_command: "npm install"
          build_command: "npm run build"
          start_command: "npm start"
          runtime_language: "nodejs"

          # Environment and services
          container_env_vars: '{"REACT_APP_API_URL": "http://0.0.0.0:5000", "NODE_ENV": "production"}'
          services: '["mongodb"]'
Example 2: Full-Stack Application (Frontend + Backend)
name: Full-Stack Auto Deployment

on:
  push:
  create:
  delete:

jobs:
  setup-runner:
    runs-on: ubuntu-latest
    steps:
      - name: Install Dependencies
        run: |
          sudo apt install -y sshpass jq
      - uses: maxklema/proxmox-launchpad@main
        with:
          proxmox_username: ${{ secrets.PROXMOX_USERNAME }}
          proxmox_password: ${{ secrets.PROXMOX_PASSWORD }}
          github_pat: ${{ secrets.GH_PAT }}

  manage-container:
    runs-on: self-hosted
    needs: setup-runner
    steps:
      - uses: maxklema/proxmox-launchpad@main
        with:
          proxmox_username: ${{ secrets.PROXMOX_USERNAME }}
          proxmox_password: ${{ secrets.PROXMOX_PASSWORD }}
          github_pat: ${{ secrets.GH_PAT }}
          public_key: ${{ secrets.SSH_PUBLIC_KEY }}

          # Multi-component configuration
          install_command: '{"/client": "npm install", "/server": "pip install -r requirements.txt"}'
          build_command: '{"/client": "npm run build"}'
          start_command: '{"/client": "npm start", "/server": "flask run --host=0.0.0.0 --port=5000"}'
          runtime_language: '{"/client": "nodejs", "/server": "python"}'

          # Services for the application
          services: '["mongodb", "redis"]'
Example 3: Basic Container (No Automatic Deployment)
name: Basic Container with Auto Runners

on:
  push:
  create:
  delete:

jobs:
  setup-runner:
    runs-on: ubuntu-latest
    steps:
      - name: Install Dependencies
        run: |
          sudo apt install -y sshpass jq
      - uses: maxklema/proxmox-launchpad@main
        with:
          proxmox_username: ${{ secrets.PROXMOX_USERNAME }}
          proxmox_password: ${{ secrets.PROXMOX_PASSWORD }}
          github_pat: ${{ secrets.GH_PAT }}

  manage-container:
    runs-on: self-hosted
    needs: setup-runner
    steps:
      - uses: maxklema/proxmox-launchpad@main
        with:
          proxmox_username: ${{ secrets.PROXMOX_USERNAME }}
          proxmox_password: ${{ secrets.PROXMOX_PASSWORD }}
          github_pat: ${{ secrets.GH_PAT }}
          public_key: ${{ secrets.SSH_PUBLIC_KEY }}
Important Deployment Notes
Application Binding
Ensure your backend services bind to 0.0.0.0 (all interfaces) instead of 127.0.0.1 (localhost only) for proper communication between components.
Examples:
# Flask - Correct
app.run(host='0.0.0.0', port=5000)

# Flask - Incorrect
app.run(host='127.0.0.1', port=5000)
// Express - Correct
app.listen(5000, '0.0.0.0');

// Express - Incorrect
app.listen(5000, 'localhost');
Special Framework Notes
Meteor Applications
start_command: "meteor --allow-superuser --port 0.0.0.0:3000"
Meteor is a large package and may take additional time to install and deploy.
Vite.js Applications
If you are using vite.js as a frontend service, you need to add the domain name of your container in the allowHosts array in your vite.config.js file.
server: {
    host: '0.0.0.0',
    port: 32000,
    proxy: {
      '/api': 'http://localhost:5000',
    },
    allowedHosts: ['maxklema-polyglot-test-main.opensource.mieweb.org']
  },
Environment Variables
Environment variables are automatically written to .env files in the appropriate component directories:
- Single-component:
.envin project root - Multi-component:
.envin each component directory
Runner Lifecycle Management
Automatic Runner Creation
What happens during setup-runner:
- Container provisioning: Creates dedicated container for your branch
- Runner installation: Installs GitHub Actions runner software
- Runner registration: Registers runner with your repository
- Network configuration: Sets up container networking and DNS
Runner Lifecycle
| Event | Action | Result |
|---|---|---|
| First push to branch | Creates runner + container | ~5-10 minutes setup time |
| Subsequent pushes | Uses existing runner | ~30 seconds - 2 minutes |
| Branch deletion | Removes runner + container | Automatic cleanup (may take up to 5 minutes) |
Benefits of Automatic Runners
- Isolation: Each branch gets dedicated resources
- Consistency: Same environment across all runs
- Scalability: No need to manage runner infrastructure
- Cleanup: Automatic removal prevents resource buildup
Container Access and Management
Accessing Your Container
After successful deployment, you'll receive output like:
━━━━━━━━━━━━━━━━━━━━━━━━━━━━━━━━━━━━━━━━━━━━━━━━━━━━━━━━━━━━
Hostname Registration: my-app-feature → 10.15.129.23
SSH Port               : 2344
HTTP Port              : 3000
━━━━━━━━━━━━━━━━━━━━━━━━━━━━━━━━━━━━━━━━━━━━━━━━━━━━━━━━━━━━
Container ID        : 136
Internal IP         : 10.15.129.23
Domain Name         : https://my-app-feature.opensource.mieweb.org
SSH Access          : ssh -p 2344 root@my-app-feature.opensource.mieweb.org
━━━━━━━━━━━━━━━━━━━━━━━━━━━━━━━━━━━━━━━━━━━━━━━━━━━━━━━━━━━━
SSH Access Methods
With password (default):
ssh -p 2344 root@my-app-feature.opensource.mieweb.org
# Use your Proxmox account password
With SSH key (if configured):
ssh -p 2344 -i ~/.ssh/id_rsa root@my-app-feature.opensource.mieweb.org
# Passwordless access
Even after the GitHub Action completes, background scripts may still be running. Wait 1-2 minutes for all processes to complete before accessing your application.
Troubleshooting
Common Issues
Setup-runner job fails:
- Check that
GH_PATsecret is set correctly - Verify PAT has
manage_runners:orgpermission - Ensure PAT hasn't expired
Container not accessible:
- Wait 2-5 minutes for background scripts to complete
- Check that your start commands are correct
- Verify your application binds to
0.0.0.0notlocalhost
Dependencies fail to install:
- Ensure dependency files (
package.json,requirements.txt) are in the correct directories - Check that files are committed to your repository
- Verify paths are relative to component directories
Services not communicating:
- Ensure backend services bind to
0.0.0.0 - Check frontend API URLs point to correct backend ports
- Verify environment variables are set correctly
GitHub Action fails:
- Check repository secrets are set correctly
- Ensure PAT has proper permissions
- Verify all required properties are provided
Debug Container Issues
SSH into your container and check:
# Check running processes
ps aux | grep node
ps aux | grep python

# Check listening ports
ss -tlnp | grep LISTEN

# Check environment variables
cat /path/to/component/.env

# Check application logs (if using tmux)
tmux attach -t 0

# Check runner status
sudo systemctl status actions.runner.*
Security Considerations
PAT Security Best Practices
- Limit PAT scope: Only grant
manage_runners:orgpermission - Set expiration: Use reasonable expiration dates for PATs
- Monitor usage: Regularly audit PAT usage in your organization
- Rotate tokens: Replace PATs periodically for security
Alternative Approaches
If you're uncomfortable sharing your PAT:
- Consider using Path 1: Supplied Runners instead
- Set up your own self-hosted runners for enhanced security
- Use organization-level runners with restricted permissions
Next Steps: Explore Path 1: Supplied Runners for a more secure alternative.