Accessing your Container from VSCode
When managing an entire repository, many developers prefer to work in an IDE, such as VSCode, rather than a terminal/shell. This guide walks you through setting up VSCode Remote SSH to connect directly to your Proxmox container for seamless development.
Prerequisites
Before getting started, ensure you have:
- VSCode installed on your local machine
- Container created with Proxmox Launchpad (either Path 1 or Path 2)
- Container access details from your deployment output (SSH port, hostname, etc.)
1: Install Remote SSH Extension
Install the Extension
- Open VSCode on your local machine
- Access Extensions: Click the Extensions icon in the sidebar (or press
Ctrl+Shift+X) - Search for Remote SSH: Type "Remote - SSH" in the search box
- Install: Click "Install" on the "Remote - SSH" extension by Microsoft
The full extension name is "Remote - SSH" published by Microsoft. This is the official extension for SSH connections.
2: Configure SSH Connection
Access SSH Configuration
- Open Command Palette: Press
Ctrl+Shift+P(Windows/Linux) orCmd+Shift+P(Mac) - Search for SSH Config: Type "Remote-SSH: Open SSH Configuration File"
- Select Configuration File: Choose your SSH config file (usually the first option)
- Windows:
C:\Users\{username}\.ssh\config - macOS/Linux:
~/.ssh/config
If the file doesn't exist, VSCode will create it for you.
Add Your Container Host
Add the following configuration to your SSH config file, replacing the values with your container details:
Host my-container
    HostName opensource.mieweb.org
    User <your-proxmox-username>
    Port <your-proxmox-port>
Configuration Details
| Field | Description | Example |
|---|---|---|
Host | Name for your container connection | my-container, my-app-dev |
HostName | Server address (always use opensource.mieweb.org) | opensource.mieweb.org |
User | Your Proxmox username | john.doe, jane.smith |
Port | SSH port from your container output | 2344, 2387 |
Example Configuration
Based on typical container output, your config might look like:
Host my-fullstack-app
    HostName opensource.mieweb.org
    User demouser
    Port 2348
- Replace
your-proxmox-usernamewith your actual Proxmox account username - Replace
2344with the SSH port from your container deployment output - Choose a descriptive
Hostname that helps you identify the container
3: Connect to Your Container
Establish SSH Connection
- Open Command Palette: Press
Ctrl+Shift+P(Windows/Linux) orCmd+Shift+P(Mac) - Connect to Host: Type "Remote-SSH: Connect to Host..."
- Select Your Host: Choose the host you just configured (e.g.,
my-container) - Select Platform: Choose "Linux" when prompted for the platform
Accept Host Key
When connecting for the first time:
- Host Key Warning: You'll see a security warning about the host's authenticity
- Accept Key: Click "Continue" or type "yes" to accept the host key
- Trust Permanently: This adds the host to your known hosts file
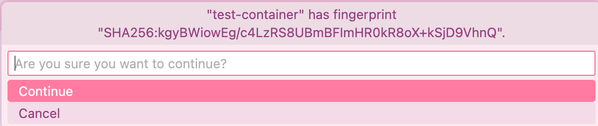
This warning appears only on the first connection. The host key fingerprint is stored to verify future connections.
Authentication
Depending on your container setup:
If You Provided a Public Key
- Automatic Login: VSCode should connect automatically using your SSH key
- No Password Required: The connection will be seamless
If You Did NOT Provide a Public Key
- Password Prompt: Enter your Proxmox account password when prompted
- Connection Established: VSCode will connect to your container
If you're frequently entering passwords, consider setting up SSH key authentication for a better experience. You can add your public key to the container later by appending it to the ~/.ssh/authorized_keys file. If you do not have
4: Open Your Project Folder
Navigate to Your Project
- Open Folder: Once connected, click "Open Folder" or press
Ctrl+K Ctrl+O - Navigate to Home: Go to
/root/ - Select Project: Choose your project directory (usually matches your repository name)
- Confirm: Click "OK" to open the folder
If you can't access /root, run sudo su in your VSCode terminal. It may prompt you for your password. This will be your proxmox password.
If you did not choose to automtically deploy your application during container setup, the /root directory is likely empty. In that case, it is recommended to create all project files inside your /home/proxmox-username/ directory.
Example Directory Structure
Your container typically contains:
/root
├── your-repository-name/     # Your project files
│   ├── src/
│   ├── package.json
│   └── README.md
├── .bashrc
└── other-files
If you used automatic deployment, your repository is cloned to /home/your-proxmox-username/repository-name/.
5: Working in VSCode
Integrated Terminal
- Open Terminal: Press `Ctrl+`` (backtick) or go to Terminal > New Terminal
- Container Terminal: You now have a terminal running inside your container
- Full Access: Run commands, install packages, start services directly
Using Sudo
When you need administrator privileges:
sudo command-here
Password: Use your Proxmox account password (same as your SSH password)
The sudo password is always your Proxmox account password, not a separate root password.
Development Workflow
You can now:
- Edit Files: Directly modify your project files
- Run Commands: Execute build, test, and start commands
- Install Extensions: Use VSCode extensions that work with remote connections
- Debug Applications: Set breakpoints and debug your code
- Version Control: Use Git integration for commits and pushes
Multiple Containers
For multiple containers, add separate entries:
Host main-branch
    HostName opensource.mieweb.org
    User john.doe
    Port 2344

Host feature-branch
    HostName opensource.mieweb.org
    User john.doe
    Port 2387

Host dev-environment
    HostName opensource.mieweb.org
    User john.doe
    Port 2401
Troubleshooting
Connection Issues
Cannot connect to host:
- Verify the SSH port matches your container output
- Ensure your container is running and accessible
- Check that
opensource.mieweb.orgis reachable
Permission denied:
- Double-check your Proxmox username
- Verify your password is correct
- Ensure your SSH key is properly configured (if using keys)
Host key verification failed:
- Remove the old host key:
ssh-keygen -R [opensource.mieweb.org]:2344 - Reconnect and accept the new host key
Container Access
Sudo password not working:
- Always use your Proxmox account password for sudo
- If you changed your Proxmox password, use the new password
Project files not found:
- Check
/home/your-username/or/rootfor your repository - Verify automatic deployment completed successfully
- SSH into the container directly to check file locations
Next Steps: With VSCode connected to your container, you can now develop directly in your remote environment. Consider exploring container deployment guides for automatic application setup.